I started by measuring the interior of my closet to determine the dimensions of my future desktop. When measuring, be sure to take into account the dimensions of your closet door casing (the decorative wood around the edge of your closet opening), which may impact your measurements. Another consideration is the height of your existing closet shelves--you will need to be able to angle the hollow door desktop up as you maneuver it into place in the closet.
I knew that I wanted to use a hollow core door to create my desk surface. Hollow core doors are smooth, lightweight (ie: easy to transport and cut), and affordable. As I browsed the door aisle at my local Habitat for Humanity Restore, I came across a beauty for just $5. This door was brand new and already primed on one side. Best of all, it was a "no-bore" door! Yes, this door was the life of every party! Just kidding; "no-bore" means "no holes (bores)".

The door was perfect, but it was too deep for my closet. At first I felt discouraged, as I didn't want to resort to using power tools to "rip" (handyman term) the door down to the proper size. Then, in an unprecedented moment of Math Competence, I did a little mental Tetris and realized that the door might work if I cut off the corners and allowed the desktop to protrude beyond the interior of the closet. (See the diagram below--click to enlarge.)
Eschewing any lifting help from the kind Habitat volunteers (remember, these doors are light as a feather), I carried the door to the register. I probably even lifted it over my head in a noticeably-uncool display of mock brute strength. I paid my $5 and, thanks to a little more mental Tetris and some string, fit the thing into the back of our old Honda Accord (the rear seats fold down to reveal an opening to the trunk).
Cutting the hollow core door proved to be fast and simple. The hardest part was getting through the solid wood at the edges--after
that, the door was, well, hollow! As I sawed away at the door, the
thin wood reminded me of the Wasa-type crackers that I used to eat
as a kid (my dad is Scandinavian). In fact, I think the crackers would
have been harder to cut with a saw than the door was. If you've ever eaten those crackers, you know what I mean. They could make doors out of Wasa.
Being a recycling-minded person, I realized that the rectangles that I had cut from the door corners would make nice, sturdy art canvases. My daughter painted on them, and then I finished the edges with cardboard and ribbon and we gave them to her two grandmothers as Mother's Day gifts. Guess I got my money's worth out of that Habitat door, eh?!
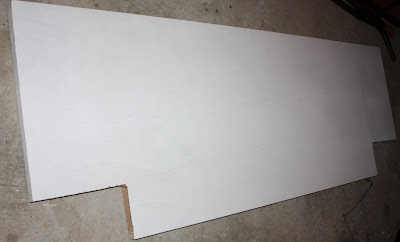
This is what the door looked like when I had finished cutting it. The longest edge is the side that went against the back of the interior of the closet--the chairs sit next to the shorter of the two long sides. I could have painted it, but instead I opted to top it with some white contact paper, which is very forgiving of all of our rubber stamp smudges and glitter glue blobs.
Now, I suppose you're wondering how I supported this light-as-a-feather desktop without using any power tools? Well, here you go: I laid each end of the desktop on top of a (filled) cardboard bankers box topped by a wooden crate. Nothing fancy, but it gets the job done and provides a little additional storage space. This has held up beautifully for us so far. Note that the crates support the front edge of the desktop more than the back, as we tend to put more weight on the front when we are working.
To finish the space, I brought in two wrought iron garden chairs so that my daughter and I can work side by side. I spray painted them with Krylon outdoor paint in a color called "Lime". I plan to add cushions at some point. A small lamp adds extra task lighting; its power cord is plugged in via an extension cord which, now that I see the photo, could probably be a little more discreetly placed.
The sides of the desktop, tucked as they are into niches in the wall at each end of the desk, offer a great place for easily-accessible craft supply storage. The mini drawers that you see below tuck in nicely and corral rubber stamps, paper punches, and smaller sheets of scrapbook paper. Drawers can be removed and placed on our work surface when we need access to a whole drawer's worth of supplies for a project.
I chose to leave some of the art supplies out in the open on the desktop; to me, there's something very inviting about a table with art materials all laid out and ready to be used, so I tucked the pens, pencils, and crayons into clear plastic cups. I love how accessible they are and how the cups reveal all of that colorful potential.
So there you have it, a craft desk (which my three year old generously calls "The Art Room") from a $5 hollow core door. Happy crafting!


