Sunday, April 22, 2012

A Chair After My Own Heart


Today I am excited to introduce you to Red Chair Blog sponsor Dutch Design Chair.


This unique product gets an A+ grade in my book for a number of reasons:

1.It’s environmentally-friendly, as it is made from FSC-Certified corrugated cardboard.  I grew up reading decorating, design, and craft books from the 1970’s (which reflected that era’s earth-friendly ethos), so a cardboard chair sounds like a fantastic idea to me!  
 

2. It’s multi-functional.  I love stools in general for their versatility; they can serve as seating, bedside tables, footstools, end tables, coffee tables, etc.  I own one little wooden stool which has literally been painted 4 different colors over the last seven years because it has been moved around our house so many times to serve so many different purposes--it has even migrated to our covered front porch.  The Dutch Design chair takes versatility a step further by also having the capacity to stand on its head and serve as a storage cube.  It was originally designed for use at festivals--festival-goers could carry their picnic items in the box and then later use it as seating.


3. It’s lightweight, but also incredibly sturdy.  Though it weighs only 2 pounds, the Dutch Design Chair can support up to 440 pounds of weight.  This design element really impresses me.  Think about it: even ants, nature’s amazing weight-lifters, can only support up to 100 times their own weight.  This chair is stronger than ants!

4. It’s priced well--at just under 25 Euros (around 32 USD), it’s a unique piece at a sensible price.

5. As a decorator, I must point out that the chair is also neat-looking.  It’s one cool stool!  My favorites are the Tree Trunk and the Beechwood.  

I think the Tree Trunk would be a fun addition to a contemporary setting:


The Beachwood would be equally at home in a shabby chic beach cottage as it would be in an urban, brick-walled loft:

And now for the Dr. Seuss question: Where, oh where, can one buy that chair?

Well, the chair is produced in The Netherlands and has been a big seller there.  It is currently available in France, Germany, the UK, Denmark, Spain, Korea and Japan.  Unfortunately, there are currently no US sources for the chair, but it can be purchased through the Dutch Design Chair Website.  Shipping to the US is 35 Euros--about 46 USD.  Orders over $150 ship free, which may inspire some local entrepreneurs to order them in bulk!

To see more styles and learn more, please visit the Dutch Design Chair Website.


Saturday, April 14, 2012

Unique DIY Birdhouses On Display

 
Today I took my daughter to the 12th Annual Birdhouse Competition at The JC Raulston Arboretum in Raleigh, NC.  The entries ranged from whimsical "flights of fancy", to houses made from recycled materials, to expertly-crafted specimens of miniature architecture.  It was a fun and inspirational event and a great excuse to get out of the house, check out some unique bird house creations (made by children as well as adults), and then enjoy the lovely surrounding gardens.

Here are photos of just a small sampling of the houses on display; I hope that they will inspire and delight you.

In the "Serious" category, I loved the mix of woods on this beautifully made house titled "Bird and Batten".  It was made by Patrick Fullwood from weathered redwood, alder, reclaimed antique heart pine, and Long Leaf pine wood. [Update: this house won first place in the "Adult Serious" category.]

The eco-roof on this contemporary birdhouse was a nice, green touch.
"Rapunzel's Nest", a ceramic birdhouse, was my daughter's favorite.  Each contest visitor was given a penny to use to vote for his or her favorite house (you can see plastic cups full of voting coins next to the houses in some of the photos).  At the mere mention of the word "Rapunzel", my daughter emphatically dropped her penny into the cup next to this bird house.

I loved the look of this "clam shack" birdhouse.  [Update: This house was made by Beth Greene, and it won second place in the "Adult Flights of Fancy" category.]
This house, called "Road Home", used maps and upcycled license plate shingles to emphasize the travel theme.

There were several birdhouses shaped like musical instruments.
This creative house made from repurposed vinyl records was one of my favorites.
 

Look closely at the song title for a laugh.

This rustic house, which looked to be made from a hollowed-out piece of tree trunk, caught our attention as well--talk about a place where a bird would feel right at home!

This whimsical, "multi-family", martin village was one of the larger entries.  [Update: This was created by Shawn Hobbs, and it won first place in the "Adult Flights of Fancy" category.]
 
And this irreverent family of "Potheads" gave visitors a chuckle.
Here's a detail of "Cover Girl"--her eyelashes were made from nails (oddly, her pupils were not dilated).
This unique space shuttle birdhouse was also from the "Flights of Fancy" category.

Entries in the childrens' categories were impressive and diverse.  

Lucy Overman won third place in the "Children 7 to 9" category for this "Magic Tree House" bird house, inspired by the book series:
 
Here's a house made from a recycled basketball made by a child in the 7 to 9 age group.


A wine box was cleverly re-purposed into a birdhouse by another child aged 7 to 9.

A bird house with built-in seed feeder and tiled with bread tabs by another child in the 7 to 9 category.


Plastic bottles and test tubes were repurposed to create this rocket birdhouse by Vincent Lorelle, who won 3rd place in the "Children 4 to 6" category.

 
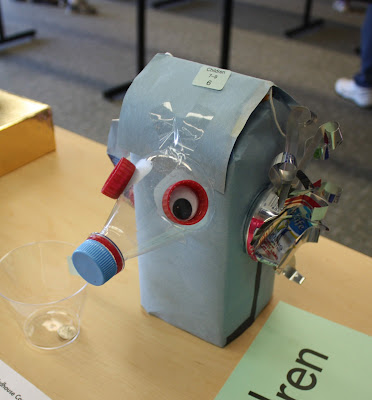
Another, in the 7 to 9 age group, used a plastic bottle and aluminum cans to create this mysterious, whimsical creature.

This refashioned paint bucket turned out nicely (child aged 7 to 9).
Anna Brown won first place in the "Children 10-12" category for this scene sharing her view of school.
Celia Boldizar won second place in the "Children 10 to 12" category with this art-themed house from a paint can and palette (note the dangling paint "drips").
One 7 to 9 year old did a nice job of "fancying up" a milk carton.

"Feathered Fun House", by Hadley Brickman, won 2nd in the "Children 7 to 9" category and Best-of-Theme Award.


As I mentioned before, this is just a small sampling of the many wonderful houses on display.  The birdhouses will be on display through tomorrow (Sunday, 4/15/12).  If you live in the Raleigh area and this post has whet your appetite for birdhouses, please click here for more information about the Annual Birdhouse Competition.

Do you have any unique birdhouses in your own back yard?  Please feel free to share in the comments:


Sunday, April 1, 2012

Decorative Faux "Chocolate" Bunnies from Recyclables

If you've got aluminum foil, plastic bags, a shoebox, and some brown paint, then you can make these adorable faux chocolate bunnies, which are perfect for decorating your mantel or your Easter buffet table. Super-sized, these guys would also make cute, affordable store window displays for a shop. In this post, I'll explain how to make both the "wrapped" and the "unwrapped" versions, as well as the foil-wrapped "chocolate eggs".
Using carbon paper or by tracing, transfer 3 bunny outlines onto 3 pieces of shoebox paperboard--or other sturdy cardboard / tag board. You can find my PDF "chocolate bunny" template here. (I based my bunny design on a photo of an (edible) chocolate bunny that I found on the Internet--with a few tweaks--so I hope that sharing my template with you here falls within the realm of "fair use".) My bunnies are around 10 inches tall. I made three--two face to the left and one faces to the right. Be aware of "bunny directionality" as you trace your bunnies.Burnt Umber (dark brown) acrylic paint gave the "unwrapped" chocolate bunnies their color. I enlisted the help of my three year old for the painting portion of the project. Our paint was thick and left visible brush strokes, which I thought made it look more like chocolate. Note our "palette": a lid from a large oatmeal canister.  Oatmeal lids make fantastic palettes for painting, finger painting, and hand prints (they are the perfect size to fit a little hand). If you have a toddler or preschooler, I recommend the long-sleeved Crayola art smock as well; you can find these on Amazon for around $5. As you can tell, ours has seen heavy use.Our bunnies curled a bit as the paint was drying, but they flattened out once the paint was dry.
Once the paint is dry, use duct tape or hot glue to attach a "stand" to the back. I used part of the edge of the shoe box lid. You can leave these "chocolate" guys plain or adorn them with flowers--silk or paper--or ribbons.To make the foil-wrapped "chocolate" bunny, start with the same cardboard bunny shape. Use hot glue or duct tape to affix the cardboard "stand" (see stand photo above) to the front of the bunny, and make sure that it is close to the same width as the base of the bunny. Use masking tape or painter's tape to attach and mold rolled / "smooshed" small plastic bags onto the cardboard bunny shape, starting from the base (plastic newspaper bags are perfect). Crumpled newspapers or tissue paper might work for this too. When you finish this step, you will have this poor guy, who I think looks like a hapless kidnapping victim from a bunny horror film:Here's what the back will look like; there is no stand on this side, as you already have the stand in front:
Next, wrap the front with aluminum foil. Mine has the less-shiny side facing out. Tape the back to hold the foil in place. This may take a little trial and error. If you need to remove your foil and start over, just smooth out your foil and try again. Add a bow at the neck.

While you have the aluminum foil out, why not use it to cover a few plastic eggs to make them look like big chocolate eggs? Use a piece of foil large enough to wrap all the way around the egg with a good-sized "tail" left over. With the egg standing "upright", wrap the foil (non-shiny side out) tightly across the front and gather the excess foil at the back of the egg. Snip excess at the back with scissors. These eggs can be painted (we will be adding some polka dots to ours soon) or kept plain. I imagine that a colored Sharpie marker could be a fun way to decorate these too:
Add a little Easter grass and a chalkboard, and you've got an easy Easter mantel. I made my chalkboard from a piece of thrift store artwork; I painted the gold frame white and then painted the chalkboard paint directly onto the "canvas" art. If you've never painted with chalkboard paint, I invite you to check out this post about my chalkboard table and this post about my chalkboard tray for DIY info.I think that these bunnies look good enough to eat, and even though they aren't edible, they would probably taste better than the real chocolate ones, which always tasted like foil to me!

Happy Easter!