Monday, January 25, 2010

A Free, Printable Decluttering Tool

Blogger's note: This post was originally published in January of 2010, and was updated in October of 2020.

Magpies are known for picking up shiny things to take back to their nests. My friend and her husband used to joke about magpies; whenever one spouse wanted to buy something that might clutter up their home, the other spouse would call out, "Magpie! Magpie!" This reminder helped the couple keep impulse buys to a minimum. 

In the spirit of simplifying your home, I've created The Magpie List, a free, printable de-cluttering tool that you can use to help you when you're clearing clutter. These are questions to think about when you are deciding what to keep and what to purge. Read the questions when you're on the fence about something and see whether one of the questions gives you just the answer you need. Some of these questions were inspired by a list in The One Minute Organizer, Plain and Simple by Donna Smallin. The rest are my own. 

To print the list, double-click the image to see it full-sized, and then right click to save it to your computer. From there you can print it on your printer or send it to your local 1 hour photo shop. Alternatively, you can screenshot it and keep it on your phone for reference. Enjoy! 

A Note for Bird Enthusiasts: Yes, I know that the cute little round bird in the image looks nothing like a magpie. Its beak isn't "beaky" enough and its tail isn't long enough. If this bothers you, just assume that the bird in the image is the Bluebird of Happiness!

This post contains an Amazon Affiliate link.

Monday, January 18, 2010

A Great DIY Laundry System for Small Spaces


Blogger's note: This post was originally published in January of 2010 and was edited in June of 2015.  Among other updates, new photos have been added, more details have been added to the DIY instructions, and product names have been changed due to manufacturer name changes.  This post contains affiliate links.

Here's a riddle. How can you store 2 loads of dirty laundry without taking up a single foot of floor space? With my favorite laundry solution for small spaces: hanging laundry bags! Household Essentials (which acquired Whitney Design in 2010) makes an affordable cotton canvas laundry bag designed to hang on a doorknob. If you hang two bags on double hooks--one above the other--either on the back of a door, or on an inconspicuous wall, you'll have a great place to toss dirty laundry.

Household Essentials laundry bagI love these bags.  They're sturdy, affordable, easy to carry with one hand, and each bag holds a full load of laundry. The hook at the top of the bag comes in handy for hanging the bag when you're transferring clothes into the washing machine.

As of June 2015, I have owned my laundry bags for over 6 and a half years now, and they are holding up great!  In my former house, I hung the bags one above the other on the back of the bathroom door as seen in this photo from 2010:


The system worked beautifully.  The only problem that I noticed over the years was that when both bags were completely full of laundry, they threw off the alignment of the door a bit due to the weight.  This problem corrected itself as soon as the bags were "reset" to empty again though.

After moving to a new house that has a bathroom layout without space behind the door, I decided to use drywall anchors to hang the bags on the interior side wall of my master bedroom closet.  Though the closet is tiny by today's standards--less than 4 feet wide and just over 3 feet deep--the bags fit right in.  Here's a photo to show placement:


See how well my laundry bags are holding up, 6.5 years later?!  The bags are sold plain, but you can easily personalize your laundry system by adding words in a fun font to the front of the bag. Here are instructions for how to create your own personalized laundry system:

Materials
  • Two hanging laundry bags
  • Two double hooks
  • Drill and/or screwdriver
  • Drywall anchors (if hanging on drywall)
  • Tape measure
  • Computer/printer/paper
  • Carbon paper
  • Ballpoint pen or dull pencil
  • Masking tape
  • Black acrylic paint and/or black laundry marker
  • Teeny tiny paintbrush (if using paint)
Instructions
1. Type your chosen words in a word processing program using a large font. I chose to type the words "Lights" and "Darks" using Palace Script MT font in a 200 point size.

2. Print out your words.

3. Trim your paper and cut a piece of carbon paper to the same size as the trimmed paper.

4. With the black part of the carbon paper facing your laundry bag, layer the carbon paper under the word and tape it onto the front of the bag. I placed mine 4.5 inches below the top edge of the bag and centered it on the front of the bag.

5. Remove the bag from the metal hanging frame, and tape the bag in a single layer to the corner of a work table so that you have a flat surface on which to work. (The photo below shows a later stage after the word has been painted.)

6. Use a ballpoint pen or dull pencil to trace the printed letters on the paper. Push down hard to make sure that the carbon paper leaves a mark on the fabric.


7. Using your teeny tiny paintbrush and black paint (or a combination of this and a laundry marker), trace your carbon letters. Allow the paint to dry completely.

8. When the paint is dry, place the bags back on the frames.

9. Use your tape measure to plan where to place your double hooks so that your laundry bags will hang one above the other, and mark your screw locations with a pencil.  In the photo at the beginning of this post, the bottom edge of the top hook is approximately 78" from the ground; the bottom edge of the bottom hook is 45" from the ground.

10. If you're hanging your bags on a wood door, use a drill and/or a screwdriver to screw the double hooks directly onto the back of the door.  If you predrill your holes, select a drill bit that is narrower than your screws.  If you're hanging your bags on drywall, you'll need to use drywall anchors due to the weight of the bags when full.

11. Hang your new laundry bags on the hooks, and enjoy your new, pretty, functional laundry system!


This post has been linked to My Backyard Eden, We Are That Family, Today's Creative Blog, A Soft Place to Land , and Thrifty Decor Chick.

Tuesday, January 12, 2010

Five Organizing Books in Five Minutes

Blogger's Note:  This post was originally published in January of 2010 and was updated in January of 2016.  

One of the perks of offering organizing services is that I have an excuse to read--and own--lots of organizing books, each with its own unique perspective and strengths. Today, I'll share one nugget of wisdom from each of five organizing books. (I plan to share additional books in the future, so stay tuned!) These nuggets aren't intended to summarize the books or even to offer the author's main message; they're just helpful tidbits.  Links are Amazon Affiliate links, but these books may also be found in your local library!

Conquering Chronic Disorganization, by Judith Kohlberg
Ms. Kohlberg shares a fascinating concept that she calls "kinetic sympathy".  Here's the idea: if you touch something, you are less likely to discard it than if someone else holds the item when you are deciding what to purge. Take home message: enlist the help of a buddy when it's time to declutter!

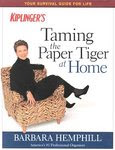
Taming the Paper Tiger At Home, by Barbara Hemphill
Ms. Hemphill explains the distinction between action files and reference files. Action files hold papers that require a specific action on your part (a phone call to make, a bill to pay), while reference files contain papers that don't require further action now but may be useful in the future (your medical records, bank statements, etc.) Filing actionable papers keeps them from piling up!

Organizing from The Inside Out, by Julie Morgenstern
I already referenced "S.P.A.C.E." in my last post. Another helpful concept is what Ms. Morgenstern calls "the kindergarten model of organization" in which you create "zones" or "stations" for different activities. For example, rather than storing your flour and sugar in your pantry with the pasta and canned beans, you can create a baking "station" in your kitchen where you store mixing bowls, measuring cups, measuring spoons, a rolling pin, flour, sugar, baking soda, etc.

Totally Organized, by Bonnie McCullough
The fastest way to improve the appearance of a room is to work from the largest item in the room to the smallest when tidying. This means that you make the bed in the bedroom, clear the table in the kitchen and dining room, and straighten cushions on the sofa in the living room and family room. This is a simple concept, but one that might not come naturally for everyone.

It's All Too Much, by Peter Walsh
Rather than starting with the "stuff" and determining what to keep and how to organize it, start by imagining the life that you want to live, and work backwards from there. A refreshing approach when you're really stuck!

Photo Credit for top photo: Stock X Change


Friday, January 1, 2010

What's In Your Junk Drawer?

Every January, I get bitten by the organizing bug. After the excesses that can come with the Christmas season (More lights! More fudge! More toys!) I find that January is a great time to pare down and simplify. I know that I'm not alone in my January urge to organize. Witness the massive sales on giant storage bins, plastic shoe boxes, and shelving at the box stores. If January inspires you to organize too, I've got some organizing-themed posts up my sleeve that I'm looking forward to sharing with you as we start a new year.

But first things first. When was the last time you cleaned out your junk drawer? If it's been awhile, you might consider trying it--for the comedic value if for nothing else. I'm not kidding; it's a hoot. You won't believe what you've got in there. You complain that you can never find a pen that works, but do you know how many functional writing instruments you have in that drawer? Seventeen. Seventeen. Well, that's how many I found when I recently cleaned out our junk drawer! I also discovered:

*A slinky
*An ancient "Happy Birthday" streamer
*Garden clippers, dog nail clippers, and a Swiss army knife
*A tiny pink plastic cat
*Part of a microphone
*The guts of an electronic baby toy that used to honk like a car (Hmmm, wonder how that toy "broke"?)
*Two guitar picks, strawberry Chapstic, and a poker chip
*A dryer hose clamp
*The keys to the homes of 4 friends, neighbors, and relatives
*A love note that my husband hid in my coat pocket when we were first dating
*The tag from the first batch of Roma tomatoes that we planted in our garden.
*And one lousy penny. One. Aren't you supposed to find gobs of money when you clean out the junk drawer?

The most amusing thing that I found was a bottle opener engraved with the words "Swiped from L & L Bar, Woodburn, Ind.". This is funny because
1. We're not really bar people
2. We don't swipe things
3. We've never been to the L & L Bar
4. We've never even been to Woodburn, Indiana
5. According to Google, the L & L Bar doesn't even exist

See what I mean? Cleaning out the junk drawer is a blast. It's a great way to celebrate the start of a new year. Way cooler than partying with a lampshade on your head, if you ask me.

Feeling inspired? Cleaning out your junk drawer is a manageable project that should only take fifteen minutes of your time. A great way to tackle a finite organizing task like this is to use Julie Morgenstern's acronym S.P.A.C.E., which stands for: "Sort", "Purge", "Assign a Home", "Containerize", "Equalize". Applied to this project, it would look like this:

1. Sort: Take everything out of the drawer and sort items into categories. For example, put all of the writing instruments together, all of the tools together, all of the coupons together, etc.

2. Purge: Within each category, decide what you can purge (get rid of). "No brainers" would include dried up pens and expired coupons, but you may find (thanks to the sort step) that you have enough multiples of other items to throw away or give away the extras. Really, do you need fifty-seven bread tabs?

3. Assign a Home: Look at each item (or category of items) and decide where that item should "live". Can that extra flashlight be moved to the car? Can those reading glasses be moved to the end table by your favorite reading chair?

4. Containerize: Consider placing some of the items in containers within the drawer to help keep the drawer neat. Select containers only after you've completed the earlier steps so you know how large each container needs to be. In our drawer, I used a narrow, shallow cardboard box to corral writing instruments and another small cardboard box to hold all of the keys.

5. Equalize: Maintain your newly-organized space by periodically assessing how it's working and clearing it out again if necessary.

So what's in your junk drawer? If you want to start the new year with a de-junked junk drawer, go ahead and clean it out and then come back here to share what you found in the comments below.

Here's to a nice fresh start to a great new year!

This post has been linked to DIY Day at A Soft Place to Land.