Tuesday, September 29, 2009

Presto, You're a Fabric Designer!


I'm so excited to have discovered Spoonflower, a fantastic site that allows users to design their own fabric. I'm not talking send in a photo of your pet salamander and they'll print it on a t-shirt for you. I'm talking today you wake up and you're a textile designer, and you can order yards and yards of your own unique custom fabric from which you can make fabulous throw pillows.

You can draw or paint your design by hand and then scan it into the computer, or design it directly on your computer (using Photoshop, for example). The site is very user-friendly (and a little bit addictive, I might add). Uploading your design is a snap. Prices start at $18.00 per yard, and swatches are available for $5.00. The most challenging part is creating a design that works in a repeat pattern. Design Sponge offers an excellent tutorial for drawing a repeat pattern (by hand) here.


Don't the possibilities make your head spin?! Beyond just the general coolness of DIY fabric as a concept, a few specific applications come to mind:

You can design a themed fabric for a nursery or a child's room:


Or incorporate a child's original artwork into a fabric:


You can design a fabric that showcases your own personal obsessions, be they Scottie dogs, cupcakes, or...cuckoo clocks:


Or design a fabric that includes custom colors that you can't find at the fabric store:


While we're on the subject of color, a great resource to have in your graphic design toolbox is Instant Eyedropper. This tool is freeware, and it allows you to find the color code for any color on your computer screen just by rolling your mouse over the text or image. It was created for web designers, but I think that it could also come in handy in all of your computer-related design escapades.

See a paint or fabric swatch that you like online? Roll over it, write down the color code, and incorporate that color into your custom fabric. Yes, computer monitors will alter your perception of the color a bit, but at least you'll be in the ballpark. And with Spoonflower offering $5.00 swatches, you can afford to tinker until you get the color just right. Cool, no?

The Spoonflower fabric images shown here are (listed from top to bottom) :
Fleur de Cuillere by Heather Dutton
Alphabet Red Lime by Deanna
Jam Tart Baby Fabric 2 by Christina Romeo
Ferocious Jungle 2 by Emily Burger
Max Miaow/Woof by Lisa Kingston
Cuk3 by Heidi Kenney
Green and Blue Flowers by Susanne Karlsson

This post has been linked to Works for Me Wednesday @ We Are THAT Family and Hooked on Fridays @ Hooked on Houses.

Wednesday, September 9, 2009

Easy DIY No Sew Pillow Tutorial

What do you get when you combine old towels, rubber bands, a paper towel tube, and a piece of fabric? Ladies and gentleman of the Blogosphere, I give you The DIY 5 Minute, No Sew, No Glue, No Batting, No Stuffing, No Ribbons, No-Talent-Required Neck Roll Pillow. To the best of my knowledge, this is my own invention, but for all I know this could be old news to seasoned blogophiles.

Most no-sew bolster pillows require that you tie the ends off with ribbon, creating a pillow that is shaped like a long piece of wrapped candy. This can be a pretty look in the right room, but sometimes you just need something a little more tailored. This is it!

Materials
  • Two old bath towels (one towel might suffice if it's a really fluffy one)
  • One cardboard paper towel tube
  • Two rubber bands
  • A piece of fabric--lightweight works best (I used part of a sun dress for this tutorial. The dimensions of the piece that I cut were approximately 23" x 35", but I ended up with a bit more fabric than I needed!)


Instructions

Step 1:
Fold your bath towels in half the long way to make two long, skinny rectangles. Stack one towel on top of the other. Place the paper towel tube at one end and roll as you would a rug. Set aside.


Step 2:
I used paper in place of fabric to illustrate this next step because the fabric edges were not clear enough to see in the photos. Fold your fabric into a tube shape so that the front side of the fabric is on the inside of the tube and the back of the fabric is on the outside of the tube. Be sure to fold your raw edges and overlap them as shown.


Step 3:
Gather the ends of your fabric in the rubber bands. The more evenly spaced you can make your gathers, the better the end result will look.

Optional Note: if you would like covered buttons on the ends of your pillow, add them during this step. To add a covered button, you would need to thread yarn or a fabric strip through the back of the button to make a "tail"and then thread this "tail" through the hole at the end of your fabric tube so that your button is on the inside of the tube during this step and the "tail" of yarn or fabric sticks out through the end where your fabric is gathered. The rubber band would then hold the button in place. If these instructions didn't make any sense, take a nap and/or drink a cup of coffee and then read them again.

Step 4:
Turn your fabric right side out so that the rubber bands are on the inside. Note: if you added buttons, they should now be on the outside.


Step 5:
Insert your towel roll into the cover, tucking the gathered fabric ends into the open center of the cardboard paper towel tube.


Step 6:
Tuck one side of your fabric opening into the other so that your towel roll is completely covered and the fabric cover is snug. (Green paper is used in the photo so that the fabric edge is visible.)


You're finished! My example pillow has a few funny seams because this fabric is recycled from a dress, but you get the idea. This is about as eco-friendly as a DIY project can get--if you ever tire of this pillow, simply disassemble it and repurpose or recycle the components! It's just my kind of DIY project: cheap, green, and easy to make! Come to think of it, that description also applies to frozen peas, but peas aren't nearly as versatile as a decor element.


A few final thoughts:

1. This project yields a pillow that is heavier than the average pillow. If a "normal" pillow is Wonder Bread, your pillow will be Granny Ethel's fruitcake.

2. You can adapt this project to make a long bolster pillow by substituting a gift wrap tube for the paper towel tube and by rolling your towel(s) starting at the short end without folding them.

This project has been posted with lots of other great DIY projects at A Soft Place to Land and at The Shabby Chic Cottage.

Tuesday, September 8, 2009

Copy Cat: Look-Alikes For Less


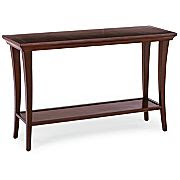
No, you're not seeing double, you've just spotted another great "copy cat"! If you like the look of Pottery Barn's Metropolitan Console Table (left photo $299.00 sale price), have a look at JC Penney's Evan Sofa Table (right photo $179.00). With almost identical dimensions (the Pottery Barn table is 1/2 inch wider and 1/2 inch longer), both tables offer simple, clean lines and a great way to complete your foyer or dress the back of your sofa!

Tuesday, September 1, 2009

DIY Storage For "Transient" Items

Blogger's Note: This post was originally published in September of 2009 and was updated in November of 2015. Some of the links in the updated post are affiliate links.

Clients often ask me how to organize items that are "just passing through" their homes. You may have seen "transients" like these in your home: the library books that need to be returned, the sweater that you need to mail to Great Aunt Myrtle for her birthday, the DVD that you borrowed from a friend and need to return, or that pair of Goodwill-bound go-go boots.

Here's a simple, cost-effective storage solution. It won't win any awards for good looks--just keep it tucked in a closet or storage area--but it gets the job done.

Start with a set of 4 wire storage cubes. The ones pictured here were purchased in 2006 for around $15 at Target. Amazon currently sells this similar set made by Whitmor for around $22.50.  Most discount retailers offer some version of this product.

Add some economy weight banker's boxes (these are one of my favorite organizing tools). When I originally published this post in 2009, Staples was selling these economy weight boxes in a 6 pack, but Staples currently only offers them in a 10 pack.  Amazon currently sells this similar product in a 4 pack for around $11.  The Staples boxes offer the advantage of plain, white sides, though this feature may be irrelevant if you are tucking this shelving into a closet.

Next, add labels. A fun idea would be to use chalkboard contact paper. If you want to keep things simple, copy the labels that I made here. I just used 8.5 x 11 paper with a 6 point page border and a 150 point "Courier" font.

Finally, use the boxes to store stuff! In my home, the "Library" box holds library books to return and also magazines to be donated to the library. The "Gifts" box holds gifts earmarked for a specific recipient in addition to generic "hostessy" gifts like candles. "Deliver" is for post office items, store returns/exchanges, and items that I need to deliver to friends. "Donate" is pretty self-explanatory; when the box gets full, items in the box get donated.

Given that "out of sight" items can be "out of mind", I'd recommend that any time-sensitive items be noted on your to-do list. Examples would be a store return that must be made within 30 days, library books with a looming due date, or a gift that must be mailed by a certain date.

Need more storage? Use chrome shelving and labeled laundry baskets!

Since this tip works for me, this post has been linked to lots of other organizing posts at Works for Me Wednesday. This DIY project has also been linked to other great DIY projects at A Soft Place to Land.